Stop Motion Animation - Planning and Creating
(Image from)
Technique/s I'm Going to Use
After looking into all the different techniques, I will need to decide on what theme I want to approach. The easiest one to complete was the timelapse as all you need to do was set up the camera and then press play. Moving your body every couple of seconds which then builds up to create a full sequence. Although, I don't think I will be able to fully explore my creative side by using this method.
Clay animation was also fun to do and is an area I might use for my animation. As you can create anything out of the clay, although this will take a long time to do correctly. This is one of the areas I am considering as I like creating the models and moving them frame by frame. I could also stick to using models, which requires me to move their position. One idea had was to recreate a Tetris game using stickers. This method is also very similar to cut out animation which uses flat cut outs instead of a 3D model. This was also fun to do as you could mix and match images to create a funny animation. Although, I still prefer using the models as their appearance is easy to change.
Last of all, Pixilation was really fun to do. As you could use the human body to create an animation you would never think is possible. This was very similar to models, apart from the models are alive. I might consider this option as a viable one for my animation as I like the creative process. Yet, at the minute I am still wanting to do a model based animation. So all of my ideas will revolve around this chosen technique. Before I move onto creating the animation, I will look into the chosen technique. I will also explore the other techniques in case I change my mind.
Research In My Chosen Technique
The first week we looked at clay/model based animation. This is a stop motion technique where either the models are all made out of clay or use inanimate objects. You then take a photo of one frame and then change the position of shape of the clay and take another photo. This then builds up to create a full animation sequence. For the example I created see Chris Palmers blog. Here is an example I created last summer as part of an introduction to the course.
The example we looked at was Morph:
The example we looked at was Morph:
This simple animation follows the adventures of the clay creation called Morph. This is created by making a model out of clay and putting a wire inside. Then an individual photograph is took. For each frame the clay is moved or shaped into something else. Then another photograph is took, when put all together it makes it look like the creation of movement due to the perception of the human eye. Morph was originally created in in 1977 by Peter Lord. The animation is also made by Aardman Animations and has been seen on TV and online. Aardman has also done other things such as Shaun the Sheep and Wallace and Gromit. Here is a clip from Wallace and Gromit a clay based animation.
Another model based animation is Game Over by Pes:
Pes uses a series of house hold objects to create a model based animation. For instance there is a scene where a candle holder shoots out candles to destroy cupcakes as if it was a Space Invaders game. They also recreate Pacman by using pizza, pretzels and wooden balls. Last of all, in one scene he recreates the Crossy Road style of game. Where a frog must avoid the traffic and rivers to get to the end. The movement shows the frog moving, the traffic moving and items moving in the river acting as lily pads. This was made available online from 6 years ago on Youtube.
The last example we will look at is an extract from Community's Christmas episode.
Community, created by Dan Harmon, normally focuses on using live action to create there episodes. Although, on occasional episodes they will try a series of new techniques, such as making the episode look like a video game or using the techniques of Glee. In this extract the whole episode is made out of models and uses stop motion techniques. In this case, it looks like the use of clay. Using the techniques of claymation. Theres a lot of motion in this extract as there is Jeff, bee's and the other characters moving at the same time. This made in 2010 and was shown on TV as well as being available on Yahoo and Netflix. For research on the other techniques, follow the link here.
Another model based animation is Game Over by Pes:
Pes uses a series of house hold objects to create a model based animation. For instance there is a scene where a candle holder shoots out candles to destroy cupcakes as if it was a Space Invaders game. They also recreate Pacman by using pizza, pretzels and wooden balls. Last of all, in one scene he recreates the Crossy Road style of game. Where a frog must avoid the traffic and rivers to get to the end. The movement shows the frog moving, the traffic moving and items moving in the river acting as lily pads. This was made available online from 6 years ago on Youtube.
The last example we will look at is an extract from Community's Christmas episode.
Generating Ideas
After doing my research into other animations that already exist, I began to generate my own ideas by creating a mind map and a moodboard. Here is the documents below. Afterwards, I will type up a summary of my ideas and the final idea I want to develop.

The first part of my creative process was to start brainstorming ideas and concepts which could be adapted to my final idea. I not only looked into previous stop motion animations, but included images of my favorite TV shows and hobbies. Which allows me to full explore the vast range of ideas to develop. I will now use this moodboard to create a mind map of ideas.
The first part of my creative process was to start brainstorming ideas and concepts which could be adapted to my final idea. I not only looked into previous stop motion animations, but included images of my favorite TV shows and hobbies. Which allows me to full explore the vast range of ideas to develop. I will now use this moodboard to create a mind map of ideas.

Ideas Summary
After listing my idea in two different forms I had a big list of ideas to choose from. My main inspiration is the animation used in old Retro games such as Pacman and Tetris. Here is a list of my main ideas:
- Using the model based technique I wanted to have a game of chess where the players use their mind to "Move the pieces" This would involve two actors and a whole set of chess. They would then take turns pulling funny faces to move the pieces across the board.
- Another variety of ideas related to the use of models/lego. Using the pieces and sets from my childhood I could use models that have already been created to make my stop motion animation. One idea was to have a lego robbery take place, as I already have a pre-made bank made from a while back in storage. Another idea relating to lego was to have a car race; where two lego vehicles race around a household. I.E down the stairs through the front room and into the kitchen etc... etc...
- My last model based animation idea was to use Tetris pieces on printed out backgrounds to recreate a game of Tetris. Although to move away from the bland game of Tetris, my title will be created by the Tetris pieces coming together to spell out "Tetris" I can then make it fade out into the game of Tetris.
- Moving away from the idea of using models, I thought I could use a time-lapse to get simple things at a quicker rate. Some of the things I thought about was having the tide coming in, a flower growing and opening and busy traffic as it turns from day to night.
- I had some other ideas for the other techniques although not much detail went into them. Some ideas for pixilation are to use people in a game of human bowling, have humans clone each other by one coming out of another. The last pixilation idea was to have a human train. This would involve a big chain of people pulling into a train station as more and more get on.
- The last technique I looked at was using cut outs. I wanted to do a parody of the latest political debates. This would involve cutting out all the campaigners and getting audio from TV. The last two cut out ideas where to have a magician transform people into animals and having a cut out being created out of cuts outs (Inception style)
I will now review all of my ideas and pick one to further develop for my final idea.
Idea Chosen
After generating a series of ideas I chose a final idea. I decided to go for the Tetris animation as I have the resources on hand. I can also use my photoshop skills from other units (Digital Graphics) to create the backgrounds. I can also use footage already out there to base my animation off. As I have a set of Tetris stickers to recreate a classic game; I will also use the stickers to spell out Tetris as the opening title. I will now fully develop this idea by creating mind-maps and breaking the idea down into production stages.
After generating a series of ideas I chose a final idea. I decided to go for the Tetris animation as I have the resources on hand. I can also use my photoshop skills from other units (Digital Graphics) to create the backgrounds. I can also use footage already out there to base my animation off. As I have a set of Tetris stickers to recreate a classic game; I will also use the stickers to spell out Tetris as the opening title. I will now fully develop this idea by creating mind-maps and breaking the idea down into production stages.
Production Preparation
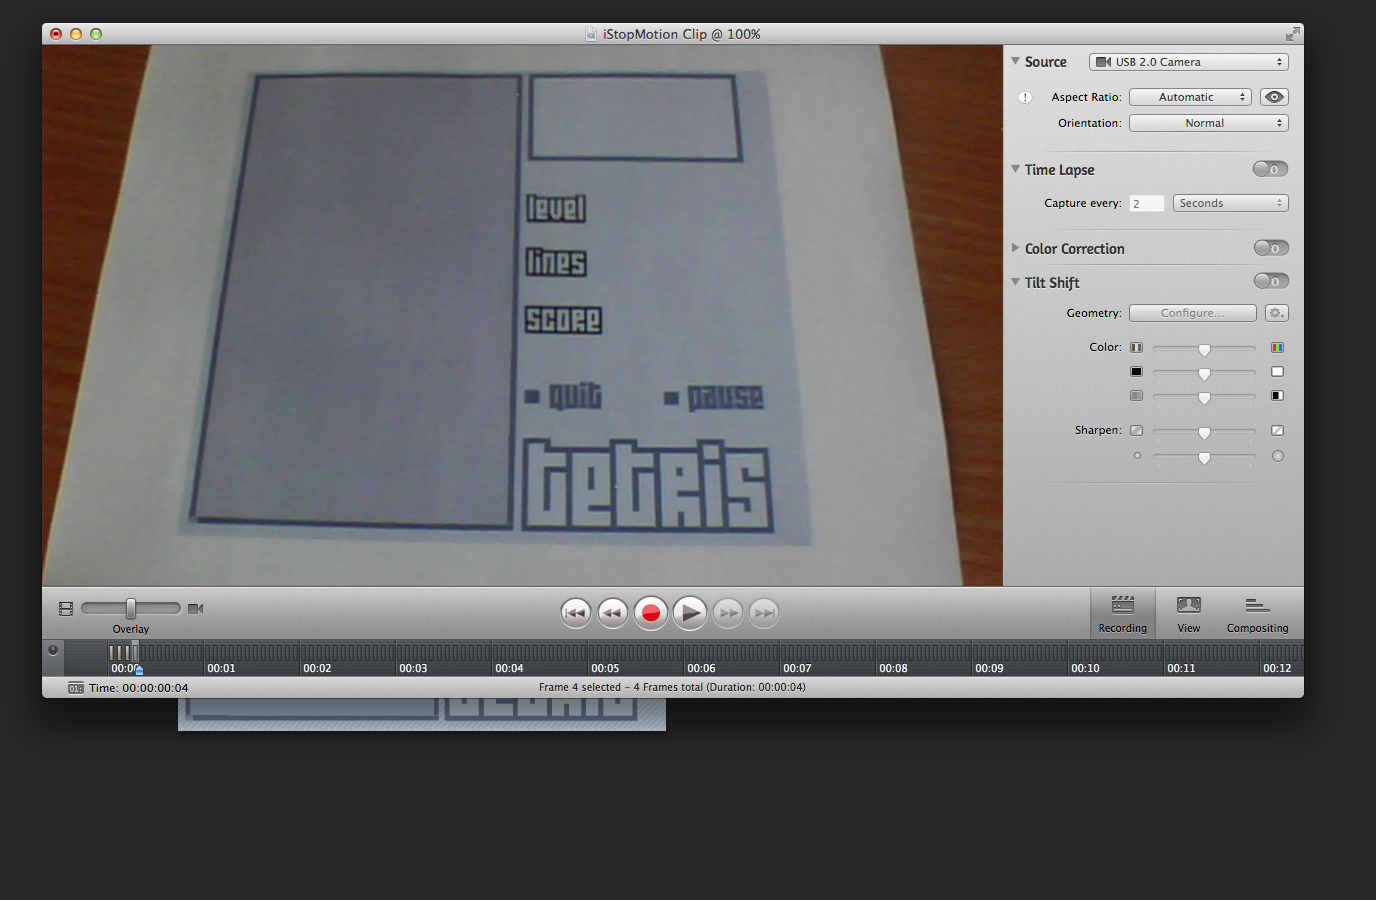
Now that I know what I want to create. I can start to add more depth to my idea. For instance since I am creating an animation on Tetris; the movement is quite simple. The pieces can only move down the page at various paces. These pieces can also rotate 90 degrees as many times until they touch the bottom or another piece. The pace will increase towards the end as there is more tension when more pieces are added into the game. Apart from the main Tetris animation, I want the start to be Tetris pieces joining togeter to spell out the title: "Tetris".

(Image from)
In order to keep continuity I will keep the camera in the same place. As Tetris is played on a 2D surface. So whilst the pieces stick out and are 3D; they will give the illusion of 2D by having me put the camera looking down onto the image. I will change the backgrounds depending on the scene. For instance the title will have a different background to the main animation. This means the camera angle will stay the same. A wide shot of a landscape and portait background, from a perspective of above (also known as birdseye view).

(Image from)
As for frames per second, I will stick to the standard for film and TV. This is the frame rate of 24. To do this I will need to take 24 photos for every second. For a animation of at least 15 seconds this means I will need to take 360 photos. Because I am using Istop Motion they will all be stored in the same program which reduces the hassle of importing all the images into a seperate program. Which can cause various problems at this level.

(Image from)
Last of all, for my soundtrack I will use a variety of effects and backing music from the orignal game of Tetris. I will then edit these to the final animation so they match up and creates the illustion that it is actually a tetris game and not a pre made animation. The main Tetris theme will play throughout the animation. When a piece moves I will use the effect present in the orignal retro game.
Target Audience
My target audience will be of those who have played Tetris and are fans of the franchise. This is because my whole animation will be based on the game Tetris. So only those who know about it will find its appeal.Although a sub target audience/interest may be generated through watching the animation. There is no restriction on who can watch the video as it will be uploaded to Youtube. The franchise is also known worldwide; which adds to its international appeal.

Another factor is that the game is friendly to all ages so the rating doesnt have a restriction on the age of the target audience.The puzzle game also has appeals for both genders, as there is a wide range of adaptions and remakes which have been created over the years. The sexuality of the audience won’t be alienated so it will fit for all sexuality’s. Overall, my target audience is both male and females of both genders/sexuality’s who live worldwide and are between the ages of 3-60. The reasons the age is capped at 60. Is that most older people have no interest in playing video games, yet again there may be a sub audience for specific people. As I want a wide target audience to draw more people in.
Story Boards and Test Drawing
Before completing the storyboard I need to do a test drawing for the Tetris letters to form the title. I did this by sticking pieces to the notebook and adding notes on how they could form a letter. I then did a drawing using the letters. See below:


As you can see there is a variety of different tests going on. One, how big are the pieces which will help with proportions, two how do you spell out Tetris using the game pieces and last of all how many pieces and colors I will be working with. In total there is around 10 of each type of sticker. Which will be more than enough to work with.
After I did this I created my storyboard in Adobe Photoshop. All the details are found on the documents themselves. This is the last pre production document I produced. I will now move on to creating my final animation. Before I create the production diary, I have included a sum up of all the research I completed, including links to assets I used in my production.


NOTE: Throughout the animation the main tetris theme will be playing throughout. Also, every time a piece moves and rotates the sound effect from the game will play.
Research
After completing the other stages of preproduction, I looked into the technical and productive qualities I require to create my stop motion animation. For each of the sites I visited I will include a summary of what it is and why I am using it.
What is Tetris?
The first thing I started to look at, was what is Tetris? This is so I can double check my ideas and thoughts relating to the game.
The first thing I started to look at, was what is Tetris? This is so I can double check my ideas and thoughts relating to the game.
This first link was great for looking into the game pieces for Tetris. Although it doesn't directly explain what is Tetris is shows the components that make up the game. These pieces are used to create lines across. Once a horizontal line has been formed they flash and remove a block; the blocks will then move down to carry on.
Link 2:
Again, this doesnt direcly explain what Tetris is, however this is a link to playable game of Tetris. Which allows me to learn through play. This will help with my planning as I can find a background to use for my own animation. It also tells me about the movement of Tetris as they move down one row at a time. Which is roughly a second at a time.
Link 3:
This Yahoo answers link was a good idea to understand what Tetris is. According to a user Tetris is : "Tetris is a classic video game. It is a simple puzzle game involving different configurations of blocks falling down. You control the place the blocks fall and make sure they fit into each other. The blocks fall at faster and faster rates with each level. It's been around for about 25 years " This is good because it matches to what I thought the game was. I can now move on to look deeper into the subject.
How to Play
Link 1:
Although this link explores how to play a web browser version of the game, it still applies the same rules to a different medium. By following these rules it makes it easy to understand how to create my animation; as I can duplicate the movement in my product.
Tetris symbols
After looking into what Tetris is I started tolook for images of inspiration.

(Image from)
This image looks really good for a background, since I will be using a tetris template for the main duration this would work for a good credits screen.
This image looks really good for a background, since I will be using a tetris template for the main duration this would work for a good credits screen.

(Image from)
This is similar to the first link shown for what is Tetris; this further gives me an understanding of what make up a game of Tetris. Such as the same symbol flipped is a different letter. I.E Tetris Z flipped is a Tetris S.
Example Tetris Game
Last of all, I looked at an example game of Tetris. This further allowed me to understand how to play Tetris and what type of movement is expected. I will duplicate movement like this for my final animation, I will also use the music heard in the background. After looking into my idea, I started to look for resources to use.
Resources Needed -Tetris Backgrounds
Title:

(Image from)
I want to use this image for my Title scren. As even without my input you are able to tell what the animation is going to be about. In my animation 3D tetris pieces will move across the screen and join together to spell "Tetris".
Main Animation

This is a similar template I want to use for the main duration of my animation. This will allow me to put on my own stickers and recreate a non digital version of the game. If I cannot find a blank template, I will load this into photoshop and used the eye dropper and brush tool; this will clear the pieces and text already in place. I will keep things such as the text of Level, Lines and Score.
End Credits
This image looks really good for a background, since I will be using a tetris template for the main duration this would work for a good credits screen. I have not included a picture as it is the same heart out of Tetris blocks from eariler on.
Tetris Soundtrack
This main tetris them from 1986 will be used for my soundtrack for my whole animation. Although the clip lasts 1 minute; I will edit it down to 16 seconds.
Tetris Sound Effects
http://www.sounds-resource.com/pc_computer/tetriszone/sound/586/
This link is for a download to all the sound effects present in a game of Tetris. In my editing I will go through the 51 effects and select the best ones to use. For instance the sound effect "SFX_Piecefall" will be used everytime a piece is falling down.
This link is for a download to all the sound effects present in a game of Tetris. In my editing I will go through the 51 effects and select the best ones to use. For instance the sound effect "SFX_Piecefall" will be used everytime a piece is falling down.
What I'm Using for my Animation
Last of all, I will be using the Tetris figures supplied in Decemebers loot crate. A shipping service which delivers a box full of random merchandise everymonth. The set includes 147 stickets which will be more than enough for my animation.
Last of all, I will be using the Tetris figures supplied in Decemebers loot crate. A shipping service which delivers a box full of random merchandise everymonth. The set includes 147 stickets which will be more than enough for my animation.
Production Diary
On the 21/4/15 I began to make my animation. Today I wanted to create the title screen. However, my first attempt went wrong. Here is the process I followed today:
The first thing I did was open my storyboard so I could see what I could check what I was animating. Although it turns out when I have produced my first attempt at the title screen I missed out the R in Tetris. Next time I will make sure to double check my storyboard more carefully to prevent the same mistakes.

I then opened the background in Photoshop so I could prepare to set the document up for print.

In the print settings I changed the format so that it would print landscape. As you can see in the top left this is the background I want to use for my animation. I will now process to the next stage of printing.

Then in the last stage of preparing for printing I changed the paper size to A3, this is so the background prints off bigger than needed so I can select areas to frame with the webcam. I will now click print. After this there was a series of problems, for a first the printer had no A3 paper. So I had to get some more from the technician.

This is a screenshot from what the printer did. Because the A3 was a special type of paper it wasn't fully absorbing the ink which causes the roller to not fully spread to ink. I couldn't use this for my animation so I had to get plain A3 paper instead.

Here is the result of using normal paper. As you can see its much better quality than the first attempt. I will now progress ontop making the title screen.

The next stage of animation required me to go into IstopMotion3 (this is the logo on the far right).


This is a screenshot showing the resources I used to make my video. The item underneath the Tetris stickers is the Hue webcam which allows me to fully move around the camera on the flexible cord. I used this to put the webcam above the background so it gets the bird eye view perspective.

This is the shot without the background, at the minute it doesn't look very appealing.

So instead, I put in the background I printed off. In order to make the lighting look good I turned off all the lights in the classroom. Otherwise, the light is too reflective and makes it hard to see whats going on.

In order to keep the background stuck down, I put blue tack on all the corners. This was so during the production I wouldn't knock the background out of place. This keeps a continuity in my work and avoids errors.

This is my first shot of production. Although from this point I lost all screenshots. The main error that occurred was that I spelt Tetris without the R. This means I will have to start over. I will now take a break and attempt to create the titles again from scratch.

To start up the process I loaded up Istop motion. At the time of recording I had to use 12fps as the programme wasn't working with 24. There is the frame where I had the webcam looking down. To record one frame I needed to click the red button; which would take a photo of a frame at a time. This is my first frame.

Here is a close up of the first frame. I liked how the framing had the bottom 1/3 cut off by the Tetris background. In the black background I will place my own stickers to create the title screen.


By using the stickers I will keep moving the stickers to their location. I kept doing this to get all the stickers on screen. Then I could rotate them frame by frame in order to build up my sequence. This is one third into the way through of the titles.

This is another shot further into the animation, this is when I started to rotate the pieces. You can see how the letters are forming on the left hand side. As you can see the purple and orange on the left will rotate together to spell a T. This was easy to do as I will need to move the tetris pieces bit by bit.

Here is the titles towards the end. After moving the pieces frame by frame you can see how the title is coming together. The camera angle has stayed the same throughout; as I want the look down view as if its a real game of Tetris.

This is the final shot of the animation; all the pieces are together now. In post production I will add in sound effects to match the movement of the pieces. This lasted for around 8-10 seconds on a total of 12 fps. I used a total of 10 pieces to do this. After the title screen, I moved onto the main piece of animation.

I then went to print of the next background, I made it to an A3 and in a portrait mode. Although, I didn't notice that the image didn't fit the whole frame.

So I ended up printing off a 1 sided A3 background that wasn't fully covered.

As you can see the background wasn't big enough. So when I placed the webcam looking down the centre had the bright blue. Yet the rest of it was white. This didn't look very good. So I decided to do some alterations.

I went back into Photoshop and used the magic eye tool to get the background color of the Tetris main screen. I then made a square in photoshop and used the fill tool to add in this color.

In the printing settings I set it to A3 and on portrait. In order to get a full screen I dragged the edges on the printing settings. This is so I avoided the mistakes of last time and made it so I had a full page of the color I wanted.

This is what it looked like under the webcam. I matches the main theme of the animation and will go well with the first print off.

In order to get them to match I cut out the Tetris image from the first print and stuck it to the new background. This is so the colors go with each other and don't over a contrast that takes your eye away from the main animation. To keep this secure I put some blue tac on the tetris square and on the background. This is so I will not have the backgrounds moving around during the animation; instead I will keep continuity.


Now that I have the assets ready, I can begin the animation. I made it so that the main tetris background lines up with the centre from top to bottom. I used a pen to write in the level number and to start the animation I placed an I shaped piece in the top left. As the top left resembles the next piece to be in play.


To get the movement of the pieces I would take a photo, resulting in one frame, and then moving the pieces and taking another photo. For instance the first frame had the I shape in the top left and the next had in in the centre.Manipulative the human perspective of moving images.

Here is one of the onion skins from the animation. When you flick through the frames you will see where the older frames are in perspective of the new one. To get the I shape to move from the top to the bottom I took an average of 12-24 frames slightly moving the piece down.

Throughout the animation I had my storyboard underneath to make sure I was matching my plan to the creation. As you can see the frame in I stop motion matches the first panel of the storyboard. As the blue piece is already secure and the orange L shape is about to be in play.

This is later on in the animation. The current state is where the orange L has moved down and rotated so it fits into the side of the I. Again, this matches the second panel directly; although the Z tool is purple in the second frame and red in animation.

In this frame the red Z is in the top left prepared to go into play.

In the next frame it is in the animation ready to go down to meet the other pieces. I will be repeating this process throughout the animation for every piece. The animation is often repetitive although the final place of the pieces is different.

This is after the red Z has mades its way down and secured onto the I. This took less than the other pieces as it doesn't have to travel as far. I would move the piece 6-8 times during the animation in order to create the illusion of movement.

Again, here is a fast forward into the animation. This is 3/5 into the animation and an total of 5 pieces are in play. From here on out the animation process speeds up as the game is becoming quicker in pace.

Like the other shots the storyboard is still open so I can judge the process compared to the plan. This is the 4th from last panel. You can see how the Istop motion screenshot matches with the shot. As the next I shape is on its way down to drop onto the T shape.

Here is a shot of the blue piece on top of the structure. This only took 5-6 movements as I wanted to speed up the animation; it also had less distance to travel due to the game and the fact its the largest piece of the game.

To keep with my plan, I then played another I piece. Notice the distance its changed from the last screenshot. From these shots I will have taken another 4-5 frames in order to create the movement. Everytime a new piece is in play; the next piece is ready in the top left. Notice how the red Z is in the top left.

Fast forward again and I am closer to the end of the main animation. This is 4/5's in. Notice how the red Z has made its way down to the two I's. At this stage I needed to go off plan as the pieces didn't match up to the design. In order for the pieces to reach to the top I had to insert more pieces which weren't in the storyboards.
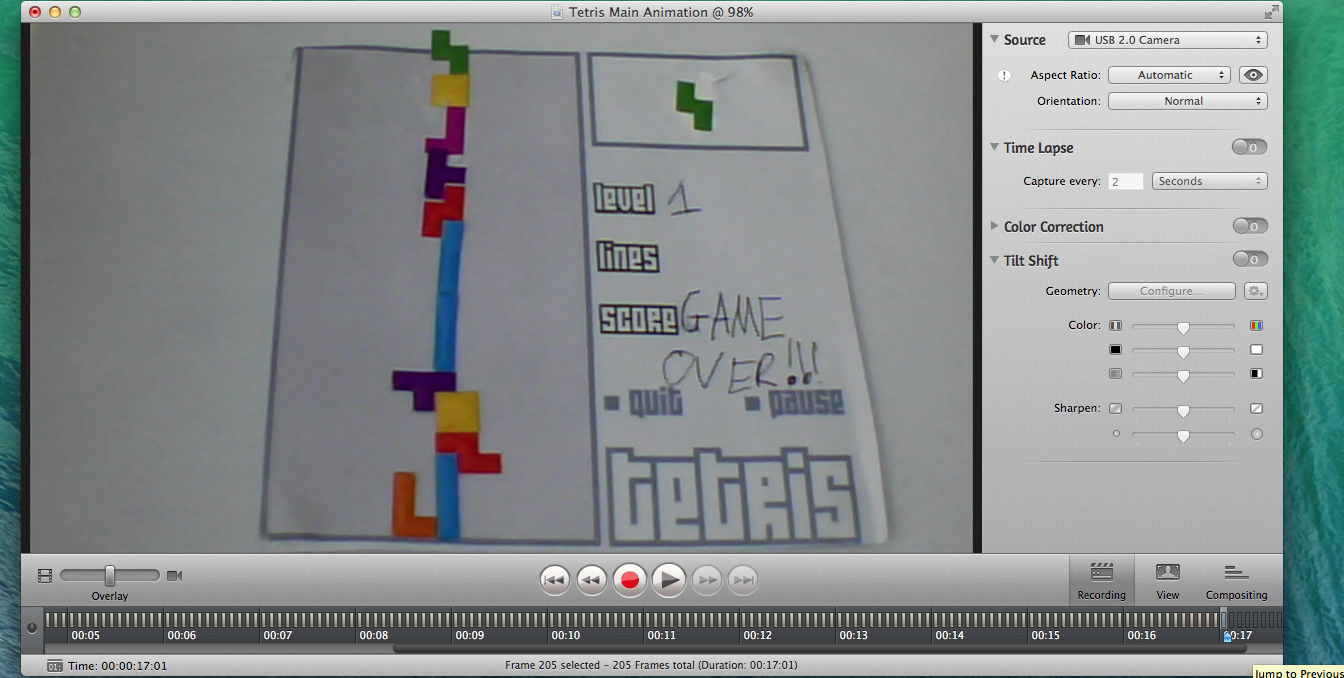
To get to the top of the Tetris game I added in an L shape, square and another Z shape. Once the frame with the Z shape appeared I added in the text for the Score. Over a series of frames I wrote game over. For instance the first frame would read : G, then GA,then GAM,then GAME on so on. Because I took over 24 frames at a 12fps second rate then this would play over a 2 second time period. Once I was happy with the final animation; it meant I could export it like the others in order to prepare for editing.

When exporting my video, I saved it under the same name and found the folder by going through the directory. I used the format H.264 because it is a common format used in the media industry. I have also used this on other video projects and it works really well.

This took a relatively short amount of time to export. Now that it is exported I can start to work on the edit. As I have the title screen, the main animation and the end slate to put together. Alongside the audio and credits.

I did a quick test to make sure my animation was working before the edit. It easily played when I double clicked the file format. Now I am happy to begin the edit.

For the edit I used the editing software Adobe Premier Pro. I have used this in the past for other projects such as the 2D animation task. I clicked on a new project and named it appropriately. It was was saved in the same folder as the rest of my assets.

I then moved onto importing my assets into premier pro. I went into file, import and media and then selected all the images and audio files. This loaded most media but some files where broken.

When I imported the file sounds for Tetris the file format they were in was not recognised by Premier Pro. This means I will have to load them in a different software and resave them in a different format.

So I opened them in Adobe Audition and then re-exported them as a an MP3. I then used the same method to import them into Pro.

The next stage was to start to move my media to the timeline. To make all the clips fit the timeline I used the first clip (the titles) and right clicked onto new sequence from clip. This sets the timeline proportions to those of the video. So any media that is put onto the timeline has the same media data, such as height, width etc...

I then dragged the Tetris theme tune to the timeline. Although it was over one minute long I dragged it down at the end to match the ending of the video duration. I added a fade out to the end of the music by right clicking it and going onto default transition.

After dragging the first clip to the timeline, I then dragged the next video next to it. So when the main video plays overall they go from one to another.

To make it a smooth transition between clips, I added in a crossfade. I did this by adding in the default transition between the two clips. Now the first clip will fade out and the second will fade in.

Then for the ending I inserted the image at the end. I didn't want it to stay still so I added a fade in blur. To do this I first added in the blur from going into effects, video effects and dragging it onto the image. To make it fade in I set the blur percentage as 0 on the first key frame, then moved forward and added another key frame. Buffing up the blur percentage. So over time it will fade in.

Because the sounds were already in nice chunks, I just needed to find where I wanted it in the animation and then I would drag it in. This was a repetitive process as the same sound is used every time a piece is moved. The sound was also quite so to increase the volume of the sound I right click the sound and clicked on audio gain. To make it louder I typed in +20. I did this for every sound clip.

So above how I would go back to keep adding in the sound effects for moving pieces. I also did the +20 audio gain for each one so it stuck to audio continuity.

I then added a different sound for the title credits, yet I used the same technique. At the beginning I wanted to use a mix of two noises. In the shot you can see where I have only put in one type of sound effects. I will now go over them and add the next sound effect in afterwards.

Here is the final audio insertion. Notice the longer audience piece below the soundtrack. This is the game over sound effect which comes into place when the last tetris piece comes in play. I added in a fade out to the sound effect so it could go back to the main theme to end the video. The left side of the timeline also shows you where I went back and added in two sound effects for the movement of pieces. I did the audio gain to these pieces although only +15 this time. As they were louder than the other sound effect.

The last thing I had to do was create the titles. To get a title screen I went into title and then credit roll. I then named this as credits. To edit the text I dragged the title screen onto the animation and used the standard text type.

I type the following: "Animated by Cameron Harris" "Based on Tetris" "Music from Youtube". I then used the centre tool so the text was perfectly in the middle. To get the titles to scroll. I selected the option along the top of the screen and clicked start off screen and end of screen. The programme then sets the text to scroll based off this.

See the top left screen for an example of the text placing over the credits image. The soundtrack was moved to match the ending of the credits and fades out alongside it.

For exporting the movie I used H.264 again. This time I had to be more precise with my options. For the preset I used custom. In the custom modes the dimensions were already set by the timeline, I then had to change the settings to 12fps so it matched the videos. Otherwise it would either play too slow or too quick afterwards. For the output name I clicked on it and found the file location. I then renamed it to final animation.

The export took a series of minutes. To check the export I played it in windows media player. It played fine with no problem, this now marks the end of the creative process. Here is the final animation:
No comments:
Post a Comment